RAID stands for Redundant Array of Inexpensive (Independent) Disks.
On most situations you will be using one of the following four levels of RAIDs.
- RAID 0
- RAID 1
- RAID 5
- RAID 10 (also known as RAID 1+0)
This article explains the main difference between these raid levels along with an easy to understand diagram.
In all the diagrams mentioned below:
In all the diagrams mentioned below:
- A, B, C, D, E and F – represents blocks
- p1, p2, and p3 – represents parity
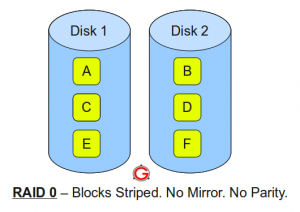
RAID LEVEL 0
 Following are the key points to remember for RAID level 0.
- Minimum 2 disks.
- Excellent performance ( as blocks are striped ).
- No redundancy ( no mirror, no parity ).
- Don’t use this for any critical system.
RAID LEVEL 1
 Following are the key points to remember for RAID level 1.
- Minimum 2 disks.
- Good performance ( no striping. no parity ).
- Excellent redundancy ( as blocks are mirrored ).
RAID LEVEL 5
 Following are the key points to remember for RAID level 5.
- Minimum 3 disks.
- Good performance ( as blocks are striped ).
- Good redundancy ( distributed parity ).
- Best cost effective option providing both performance and redundancy. Use this for DB that is heavily read oriented. Write operations will be slow.
RAID LEVEL 10
- Minimum 4 disks.
- This is also called as “stripe of mirrors”
- Excellent redundancy ( as blocks are mirrored )
- Excellent performance ( as blocks are striped )
- If you can afford the dollar, this is the BEST option for any mission critical applications (especially databases).
sumeber : http://www.thegeekstuff.com
 1:55 AM
 ADE
ADE
 Posted in:


